As the days grow shorter and the shadows grow longer, if you are anything like me, you will return home from crisp sunny walks with huge bunches of beautiful leaves in glorious shades. This leaf bowl project is a lovely way to preserve and use them up!

This really is a very simple little autumn craft but it does take a bit of patience and can be a little bit fiddly. Older children have no trouble with it, younger ones or those who struggle a bit with fine motor skills might find it harder. I’d still encourage them to have a go – their bowl might not be as neat but it will certainly be pretty! You also need to allow time for the leaves to press, don’t expect to make them on the same day as your leaf collecting.
How to Make a Leaf Bowl
1. Prepare Your Leaves
- Press your leaves as soon as you return from your walk, if you leave it to the next day they will already be crisping and curling and their colour will be fading rapidly.
- I pressed the leaves for this leaf bowl project between layers of kitchen roll with a sheet of card above and below and a book perched on the top of them all to weigh them down a bit and hurry the process up because I am impatient. They don’t need to be pressed for weeks, they just need to be flat so a few days will do, mine were left for about 10 days and they seemed happy!

Make Your Leaf Bowl
- Once your leaves have been pressed lay them out and choose the ones which have no blemishes, cracks or nibbled bits and carefully snip off the stems.
- Find a bowl the right size for your leaves, I used a deep round soup bowl for this one and an egg cup for the project you can see at the end of the article.
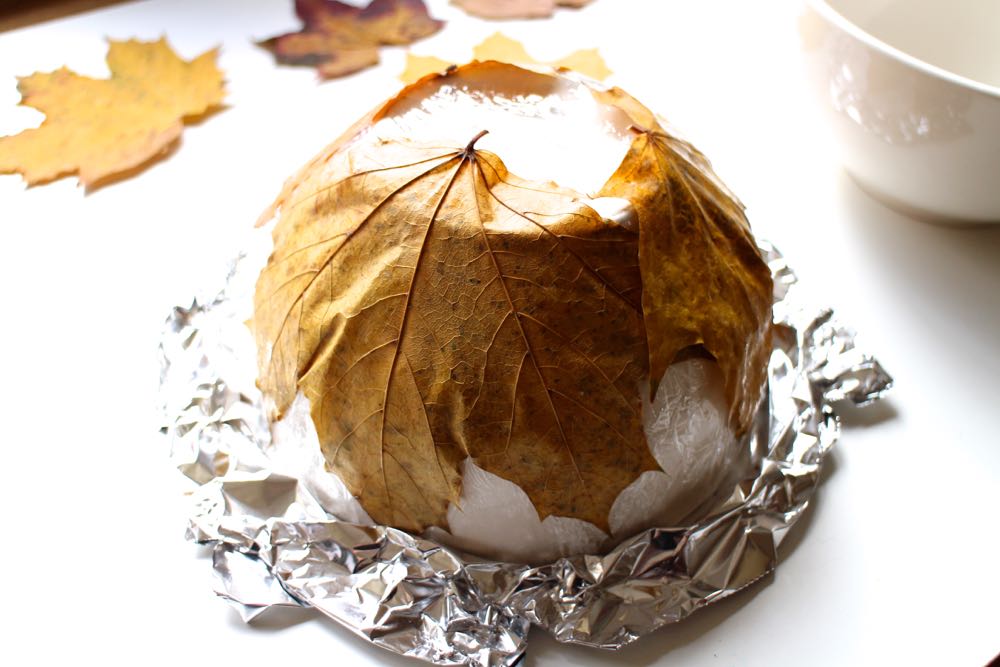
- Cover your bowl with a layer of cling film and then paste all over the cling film with a layer of slightly watered down PVA glue (also known as school glue or white glue).
- Press a layer of leaves onto the gluey cling film, cover with another layer of film and wrap around tightly.
- Leave overnight. This allows the leaves to soften and mould to the shape of your bowl. Leaves are contrary things and I found that if I didn’t allow them this softening and moulding time they just unfolded and fell off, such drama queens!
- Remove the top layer of cling film and brush the leaves with a layer of undiluted glue.
- Carefully choose your next layer of leaves, overlapping the first layer and thinking about colour and shape as you go. With this layer I removed the stalks and cut a V shape into the leaf where they had been to make them more malleable and to stop them misbehaving.
- Press them onto your gluey leaves and coat them in turn with a layer of glue.
- Cover again with a tight layer of cling film and leave for a few hours or overnight.
- Remove the outer layer of cling film, brush with another layer of glue for good measure and leave to dry.
- Once the glue is dry, take your leaf bowl off your mould and carefully remove the cling film from inside your masterpiece. This is quite tricky, I cut down the cling film and removed it slowly so I didn’t break the fragile trips off the leaves. I found it easier to pull up from the centre of the bowl rather than pull down into it.
This was the point which so often happens in crafting when you think something has gone wrong but then realise that something wonderful has happened and the craft has taken on a life of its own!
As I removed the last bits of cling film I realised that tiny bits of glue and cling film were being left behind. I reached for my scissors to trim them off but, as I held the bowl up to the light, I gasped – they looked just like ice crystals on a winter leaf! I let them stay.

This tiny bowl was made using much smaller leaves and formed using an egg cup as a mould. It is very delicate because I wanted to preserve the colour of the leaves when the sun shines through them so I only used one layer with another slightly overlapped and I had to reinforce the base by wrapping a line of leaves around it horizontally.
I love the way the light catches the jagged edges of the leaves and the depth of colour as light shines through. Placing these bowls in front of a lamp or on a sunny windowsill means that light can shine through them and show them off in all their glory.
You could also experiment using plates, glasses and saucers as moulds as well as leaves of different shapes and sizes – I do fancy a leaf plate!

We made our leaf bowls a year ago and they are still sitting happily on our kitchen windowsill!
If you have lots of leaves left, or have caught the leaf hunting bug, why not have a go at this beautiful Autumn Leaf Wreath?

Pin this autumn craft for later

If you are looking for more autumn crafts ideas why not check out my autumnal Pinterest board?

I absolutely love this! I can’t resist picking up leaves on my walks and usually press them for the children to collage. This project takes it to another level – thank you for this inspiration!
Thank you so much! What a lovely comment, I’m so glad you popped by 🙂
I love this, would be perfect for some little autumn treats on the table.
It would! Or for an autumn collection from the woods 🙂
What a fab & intriguing idea – def one for us to try. We ALWAYS end up with bundles of leaves. PS if you can think of anything to do with the plethora of sticks we always end up with too, then please blog it! Love your crafty ideas 🙂 x
Oh I have LOADS of things to do with sticks! I shall oblige ASAP 🙂
You’ve truly inspired me; we’re completely surrounded by beautiful autumnal leaves here in the new house and I’ve been looking for crafts for Edith and I to do. This is now right at the top of our list!
Fantastic Jayne! I hope you both enjoy it as much as we do!
Thank you for sharing. I should have read this first as I have not pressed the boys leaves – but I am sure they will love to go out hunting for more.
I hope so! Do let me know how you get on!
what a great idea! I done it with tissue paper before but never with leaves. beautiful
Thanks Otilia! I love making them with tissue too – you can get some lovely colour and light effects!
Pinning this to my board so that I can try later in the year, thank you Chris for sharing this concept, P
My pleasure Patrick, do let me know how you get on!
Love your leaf bowl for Autumn. Were going to have fun making it and placing on our table. Thanks!